Afternoon storm risk is the line that matters. Everything else is comfort. In summer, plan to be off the ridge before the build-up starts, not as it starts. Forecast for the summit point, adjusted for its elevation · data from Open-Meteo.
Centennial 13er · Southwest Slopes
Overview
Jupiter Mountain rises above the east side of Chicago Basin in the Weminuche Wilderness, across from the well-known 14ers Windom, Sunlight and Eolus. There is no road access. Almost everyone rides the Durango and Silverton train to Needleton, backpacks about 6 miles up Needle Creek into Chicago Basin, and climbs Jupiter from camp. This description starts from a camp in Chicago Basin.
From camp, a trail climbs toward Columbine Pass. You then follow a faint climbers' path up a grassy basin full of wildflowers and steep tundra slopes. Higher up the path fades and you pick your own way over rock and grass toward the west ridge. The last short stretch to the true summit is the hardest part, with some route-finding and easy scrambling through big blocks. The true summit is the westernmost of several rock towers on the summit ridge.
From camp, the climb is about 5 miles round trip with about 2,800 feet of gain. Plan on 4 to 6 hours. The whole trip, including the train and backpack, is 17 miles and 5,630 feet of gain, and most people take at least three days. You are far from help, so small problems can become serious.
Plan of the day
Start by
By 5 a.m. from camp. San Juan storms often build by late morning, and the upper slopes have no shelter.
Turnaround
If you are not at the top of the steep southwest slopes, near 13,400 feet, by 10 a.m., turn around. Leave the summit by 11 a.m. at the latest.
Crux
The final stretch from the false summit to the true summit. You need to find a way through large rocks and blocks, with some easy scrambling.
Route-finding
The trail to the Columbine Pass trail junction is clear. The climbers' path up the basin is faint but followable. Above about 12,500 feet the path fades out, and you need to pick your own line. Near the top, make sure you go to the westernmost tower; the false summit can fool you.
Water
Needle Creek and the streams near the trail junction at about 11,700 feet have water. There are small streams in the grassy basin early in the season. There is no water on the upper slopes. Filter or treat all water.
There is no road to Chicago Basin. Ride the Durango and Silverton Narrow Gauge Railroad to the Needleton stop. Train schedules and which stations serve the Needleton drop have changed over the years, so check with the railroad well ahead of time and book your return pickup. You can also hike in on the long Animas River trail, but it adds many miles.
From Needleton, cross the Animas River on the footbridge and walk south about 0.8 mile to a trail junction. Turn left onto the Needle Creek trail. It stays on the north side of the creek and climbs steadily for about 6 miles into Chicago Basin, near 11,000 feet. Campsites fill up in summer, and campfires are banned. Mountain goats in the basin are used to people and will go after sweaty gear and urine; keep your gear close and do not feed them.
Needleton (Durango & Silverton train). Road conditions near the trailhead change after storms. Check your clearance and have a backup plan for a lower lot.
RidgeTrail in the treesTundraTalus and screeExposed to lightning
The line is elevation, the band underneath is the ground, and the numbered dots match the steps below. Mileage and elevations are approximate.
1
Chicago Basin camp 11,100' · 0 mi
Start from camp and head up the main Needle Creek trail toward the head of the basin. The rugged peaks of Windom, Sunlight and Eolus fill the view ahead.
2
Columbine Pass trail turnoff 11,200' · 0.3 mi
At the head of the basin, look for the Columbine Pass trail heading east into the trees. Do not take the climbers' trail to Twin Lakes, which goes up toward the 14ers.
Watch for: Easy to take the wrong trail here. Head east toward Columbine Pass.
3
Needle Creek crossings 11,250' · 0.4 mi
The trail crosses two forks of Needle Creek. The crossings are usually on rocks or logs, but can be high in early summer.
Watch for: Wet, slick rocks at the crossings.
4
Switchbacks and traverse 11,500' · 0.8 mi
The trail switchbacks east and then makes a climbing traverse to the south through forest and meadow.
5
Trail junction meadow 11,680' · 1.1 mi
Once out of the trees you enter an open meadow where two trails come together, close to a few small streams. Step over the first stream and watch for a faint climbers' path that climbs the tundra to the east-northeast.
Watch for: Last reliable water. Fill up here.
6
Grassy basin 12,000' · 1.4 mi
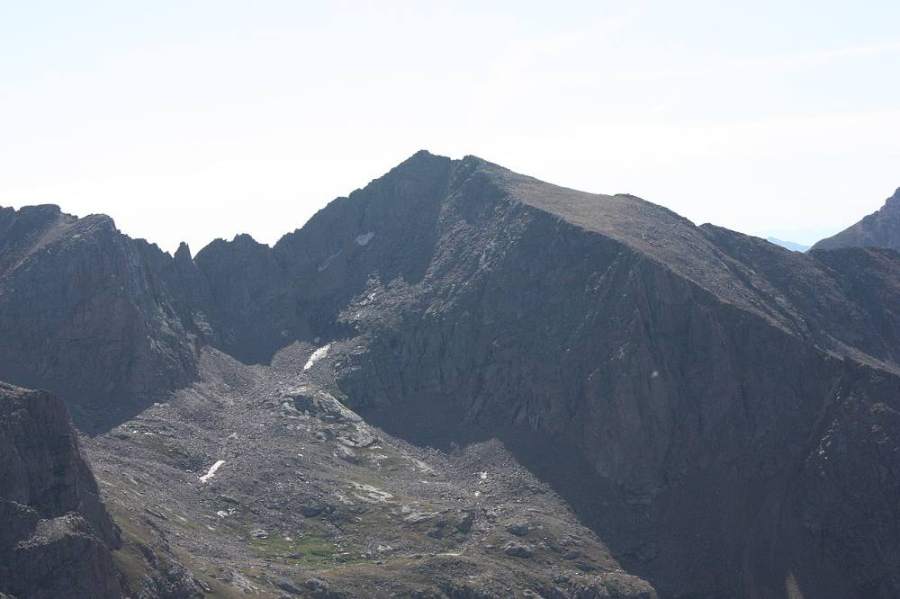
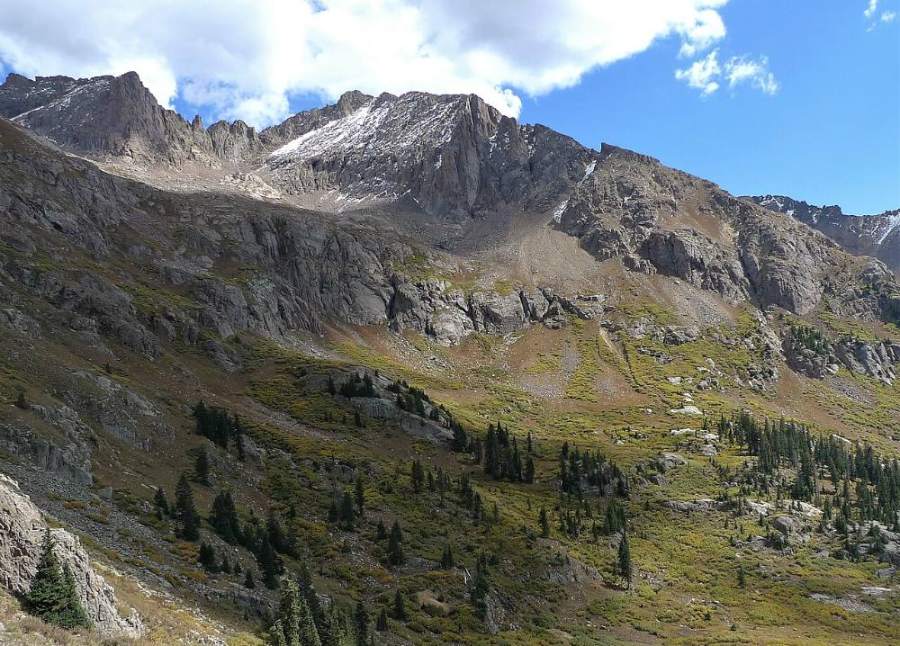
Follow the faint path through a small stand of trees and up a large basin of grass and wildflowers. Stay left of the main drainage. Jupiter's steep southwest slopes rise ahead.
Jupiter Mountain above Chicago Basin · Photo: Jeremiah LaRocco
7
Base of southwest slopes 12,200' · 1.6 mi
The path turns north and climbs steeply up the slopes. The ground is still mostly tundra, but it is steep.
Watch for: Steep grass is slick when wet.
8
Rock outcrop switchbacks 12,400' · 1.8 mi
Around 12,300 feet the path switchbacks across a rock outcrop, still on tundra, then heads east to a tiny flat spot where it fades out.
9
Path fades 12,500' · 1.9 mi
From here there is no clear trail. Take the easiest line up over grass, rock and rubble, generally heading toward the west ridge above you.
Watch for: Pay attention to where you came from. You will need to find this spot on the way down.
10
Upper slopes 13,000' · 2.1 mi
The slope turns rockier as you climb. Pick your way over boulders and rubble. Keep a steady pace.
Watch for: Loose rock. Watch for people below you.
11
Near the west ridge 13,400' · 2.3 mi
You come close to Jupiter's west ridge. Follow the ridge or the slope just below it toward a false summit.
12
False summit 13,700' · 2.45 mi
Reach the false summit. The true summit is the westernmost of several rock towers along the ridge to the east. From here the climbing gets harder.
Watch for: Check the weather. The next section is slower than it looks.
13
Summit 13,838' · 2.5 mi
Find a way through the large rocks and blocks to the true summit, using your hands in a few spots. From the top you can see the Chicago Basin 14ers, Columbine Pass, and the peaks of the Weminuche in every direction.
Watch for: Take care on the blocks going down. Do not linger if clouds are building.
Along the route
Jupiter Mountain · Photo: Jeremiah LaRocco
Landmarks to know
The Needleton footbridge over the Animas River
Chicago Basin with Windom, Sunlight and Eolus at its head
Columbine Pass trail heading east into the trees at the head of the basin
Open meadow with small streams where the two Columbine Pass trails meet
Rock outcrop crossed by switchbacks around 12,300 feet
False summit, then a row of rock towers; the true summit is the westernmost
Getting down
Go back through the blocks to the false summit, then down the upper slopes. The key is to find the spot around 12,500 feet where the climbers' path starts. If you drift too far one way or the other, you can end up on steeper slopes or rock bands. Look for the rock outcrop and the switchbacks below it.
The steep grass on the southwest slopes is slick when wet, so go slowly and use poles. Once in the grassy basin, follow the path back to the trail junction meadow and then the trail back down to camp. At the head of Chicago Basin, make sure you turn back down the main trail to your camp.
If things go wrong
The top of the steep southwest slopes, near the west ridge, is the main decision point. If weather is building, turn around there. The fastest way to safety from anywhere on the upper route is back down the slopes to the grassy basin and the trail. Do not try to drop off the far side of the ridge. If lightning is close, get off the ridge, spread out, and crouch low on your pack. If someone is hurt, keep them warm and still. Chicago Basin is remote, and rescue can take a long time. Other climbers are often camped in the basin and may be able to help. Carry a satellite messenger if you can, and call 911 when you can reach help.
3D flyover
No 3D flyover for this peak
After the Columbine Pass trail, the last mile follows a faint path that fades out, then open slopes and boulders, with no set trail to follow. A flyover only works when there is a set trail to trace. Without one, the line would be a guess, and a guess could send you the wrong way on the mountain. Use the step-by-step route with a good map and GPS track instead.
See the trail on video
A climb of this route filmed by Zach Forster. The video belongs to them and only plays when you press play.
Other routes
Every way up Jupiter Mountain we list, with its class.
This describes the route on a dry summer day. Snow, ice, a washed-out road or an afternoon storm can make it a very different climb. Check recent conditions the week you go and turn around when the day tells you to.