Afternoon storm risk is the line that matters. Everything else is comfort. In summer, plan to be off the ridge before the build-up starts, not as it starts. Forecast for the summit point, adjusted for its elevation · data from Open-Meteo.
This is a technical climb. Falls here can be fatal. It is for experienced climbers who are comfortable on steep, exposed rock and can decide when to turn back.
Combo route · Crestones Traverse
Overview
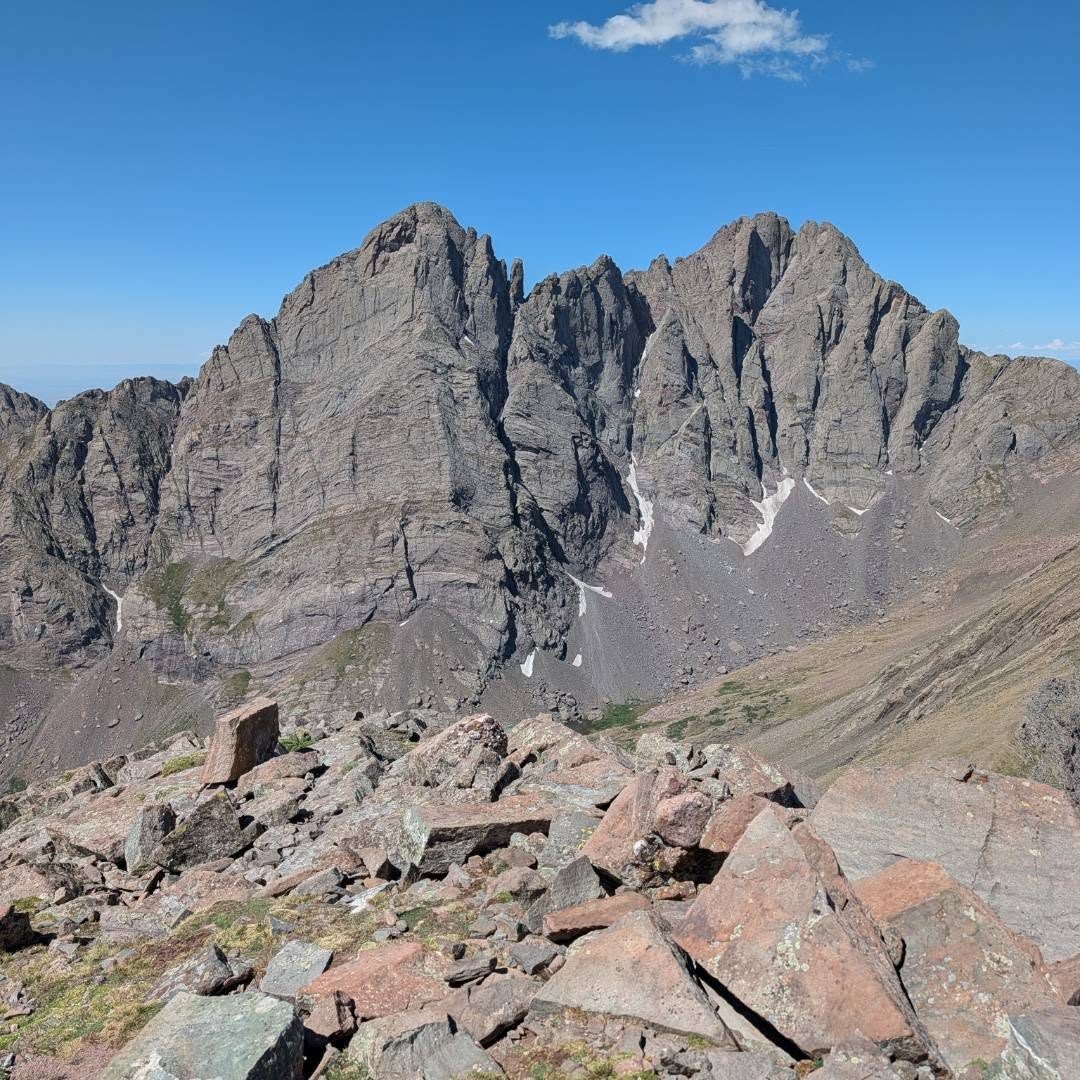
The Crestones Traverse links Crestone Peak and Crestone Needle along the jagged ridge between them. It is one of the hardest and best-known link-ups in Colorado. The route is Class 5. The hardest move is about 5.2, and the final wall to the Needle summit is Class 4 with deadly exposure.
This is only for experienced climbers. You should already be confident on Class 4 rock, good at route-finding, and able to downclimb or rappel. Most people climb from the Peak to the Needle without a rope. Going the other way means your first move is rappelling the crux wall. Many consider that the smarter choice.
The day covers about 14 miles and roughly 7,000 feet of gain from the South Colony Lakes trailhead. Expect 12 to 16 hours car to car. Many parties camp near the lakes to split it up.
Plan of the day
Start by
Very early, often 3 a.m. from the trailhead or 4 a.m. from a camp in the basin. You need dry rock and a clear sky for the whole traverse.
Turnaround
If you are not on Crestone Peak's summit by about 9:30 a.m., do not start the traverse. Once on the traverse, retreat is slow, so commit only with a good forecast and time in hand.
Crux
Two spots. Two spots: the steep gully east of the Black Gendarme with its 5.2 bulge, and the Class 4 wall right under the Needle summit. A fall on either would probably kill you.
Route-finding
Hard. Finding the right entry out of Crestone Peak's red gully near 13,650 feet is key. After that, follow cairns across several ribs and gullies. Stay low until you must climb higher.
Water
Streams and lakes in the basin near the start. There is none on the traverse. Carry 3 liters or more and treat what you collect.
From Westcliffe, drive south on Colorado 69 for 4.5 miles. Turn right on Colfax Lane and follow it 5.5 miles to its end. Go right and follow the dirt road for 1 mile until you hit a junction. Continue straight onto the 120 Road; the lower trailhead, at about 8,800 feet, is 0.3 mile up.
High-clearance vehicles can continue 2.7 miles to the upper trailhead near 9,950 feet, just before a stream crossing. The road is gated here. The trail starts by the kiosk in the main lot.
RidgeTundraScramblingExposed to lightning
The line is elevation, the band underneath is the ground, and the numbered dots match the steps below. Mileage and elevations are approximate.
1
South Colony Lakes trailhead 9,950' · 0 mi
Start at the kiosk in the upper lot. Follow the approach for Crestone Peak's South Face route toward South Colony Lakes.
Watch for: If you park at the lower trailhead, add about 2.7 miles each way.
2
Broken Hand Pass 12,900' · 4 mi
Climb out of the basin to the pass above the lakes. Cross it and descend the far side toward Cottonwood Lake.
Watch for: Steep, loose trail on both sides of the pass.
3
Red gully 13,000' · 4.8 mi
Leave the lake area and climb into the long red gully on the south face of Crestone Peak. It leads to the notch between the two summits of the Peak.
Watch for: Rockfall from people above is common. Wear a helmet.
4
Crestone Peak summit 14,299' · 5.6 mi
Once you reach the notch, scramble up to the top of Crestone Peak. Check the sky and the time before you start the traverse.
Watch for: This is the last good decision point.
5
Traverse entry 13,650' · 5.8 mi
Go back down the red gully to about 13,650 feet. On the east side, look for cairns on tilted rocks just outside the gully. Scramble east out of the gully and descend a little to start the traverse.
Watch for: The right entry is crucial. Missing it leads into harder ground.
6
First rock rib 13,550' · 6 mi
Stay low and follow cairns over a few small rises and dips until you come to an obvious rock rib. Climb about 100 feet of easy ground to a gap in it.
7
Second red gully 13,500' · 6.1 mi
From the rib, look down into a different red gully. This is the halfway point. Drop about 150 feet into it and cross to a chute full of rubble. Climb about 250 feet up the chute, staying left where it narrows.
Watch for: Loose rock in the chute.
8
Break in the rib 13,700' · 6.3 mi
Top out through a gap in the rib near 13,700 feet. Drop a little and cross one more rib. The view opens up and the Needle's summit area comes into sight.
9
Black Gendarme 13,650' · 6.4 mi
Spot the large, dark tower rising from a low point on the ridge. Traverse below it without losing much height. Find the steep, narrow gully on its east side.
10
The bulge 13,750' · 6.5 mi
Continue under the Black Gendarme to the base of another tower. Turn left and climb to the bulge, a 5.2 move. Go slowly and search for grips both on the bulge itself and just left of it.
Watch for: Going around to the left adds exposure. Many climbers want a rope here.
11
Short knife edge 13,850' · 6.6 mi
Climb the steep gully above to a wall. Move right onto it. It narrows to a short, very exposed knife edge about 10 feet long. Cross it to solid ground.
Watch for: Big exposure on both sides.
12
White rock and ledge 14,050' · 6.75 mi
Scramble up a jumble of rocks. Follow cairns across to a patch of white rock, then up a small gully about 100 feet to just below the crest. Turn right on a ledge to a flat spot, then left to the base of the final wall.
13
Class 4 wall 14,120' · 6.8 mi
Do not go up unless the wind is calm and the rock is dry. Pick a line and stay a bit left, near the crest, where the holds are best. The climbing eases near the top, where you may find a rappel anchor.
Watch for: A fall here would likely be fatal. This is the place to use a rope if you have any doubt.
14
Crestone Needle summit 14,196' · 6.9 mi
Scramble a short way to the top of the Needle. You have now climbed both Crestones.
Watch for: Your descent is still hard Class 3. Stay focused.
Getting down
Go down Crestone Needle's standard South Face route. It is steep Class 3 in gullies, with loose rock and several route-finding spots. Descend to Broken Hand Pass, then follow the trail down past South Colony Lakes and back to the trailhead.
If things go wrong
Before the traverse, the easy bail is back down Crestone Peak's red gully and out the way you came. Once on the traverse, turning back means reversing everything, which is slow. Past the halfway gully, it is usually faster to continue to the Needle than to go back. If a storm hits, do not climb the crux wall wet. A rope and the skill to rappel give you options. Rescue on this ridge takes many hours. Call 911 if you have signal.
Other routes
Every way up Crestone Peak we list, with its class.
This describes the route in its usual season. Distances and elevations are close estimates for planning. Snow, ice, rockfall, a washed-out road or an afternoon storm can make it a very different climb. Check recent conditions the week you go and turn around when the day tells you to.