Afternoon storm risk is the line that matters. Everything else is comfort. In summer, plan to be off the ridge before the build-up starts, not as it starts. Forecast for the summit point, adjusted for its elevation · data from Open-Meteo.
This is a technical climb. Falls here can be fatal. It is for experienced climbers who are comfortable on steep, exposed rock and can decide when to turn back.
Technical route · Ellingwood Arete / Ledges
Overview
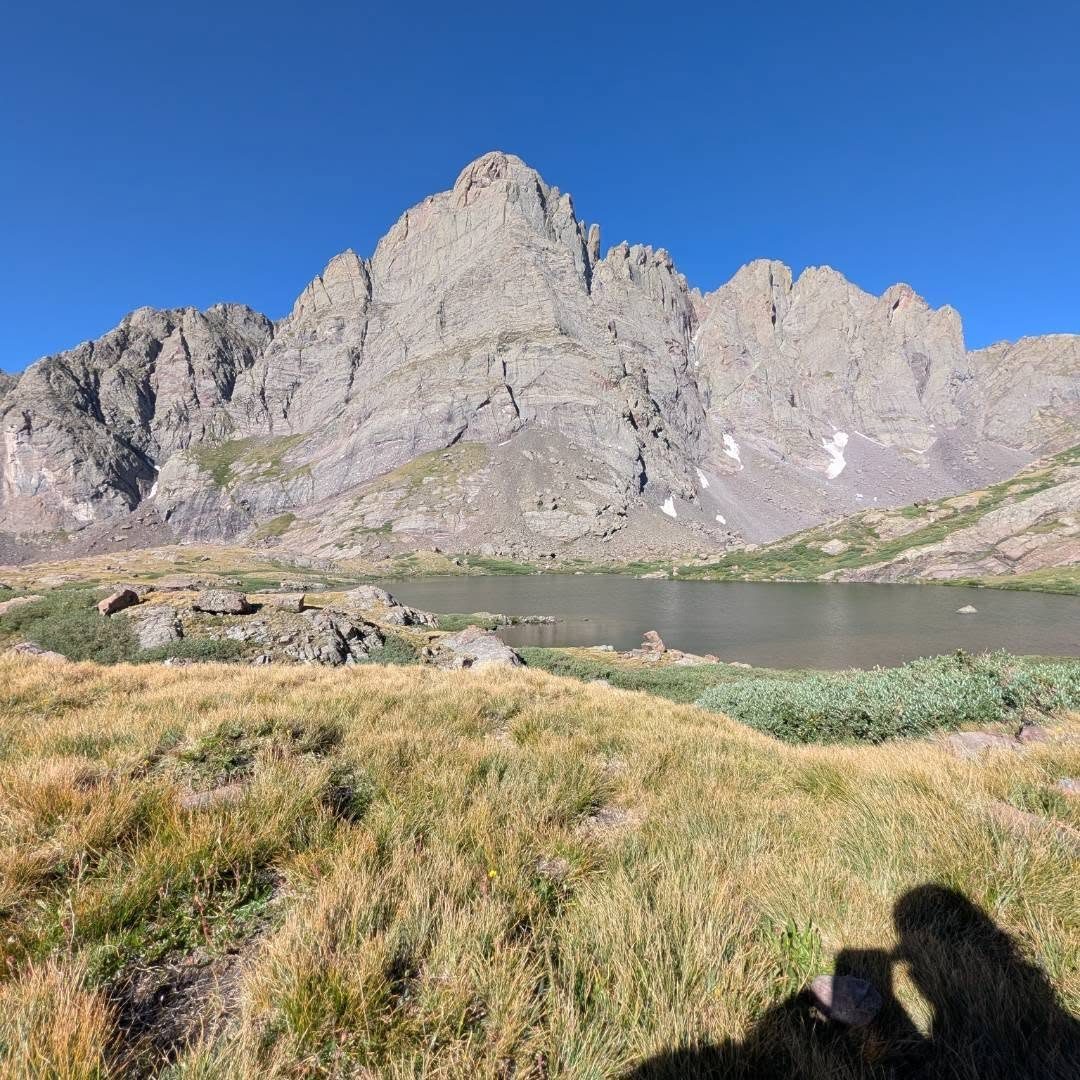
The Ellingwood Arete, first known as the Ellingwood Ledges, is a technical rock climb up the northeast face and arete of Crestone Needle. It rises straight above Upper South Colony Lake. It is Class 5, with a 5.7 crux pitch high on the route and lots of Class 3 and 4 ledges in between. This is a roped climb for experienced climbers only. It is nothing like the standard South Gully scramble.
There are two ways to get past the lowest cliffs. If you take the direct start, expect two or three 5.4 to 5.6 pitches up a large open book. The ledges start avoids those pitches and works up and across the face on Class 3 and 4 grassy ledges. Both meet on the arete just above a reddish knob about halfway up. Above that, the route has a short stretch of mandatory low fifth-class climbing, more ledges, and two headwall pitches that finish near the summit.
The round trip is about 11.25 miles with roughly 4,400 feet of gain. Most parties need a very long day, often 12 to 16 hours car to car, or they camp at the lakes. You must know the South Gully well enough to downclimb it, since that is the way off.
Plan of the day
Start by
By 3 or 4 a.m. from the trailhead, or at first light if camped at the lakes. You need time for the climb and the long descent.
Turnaround
If you are not at the base of the face by 7 a.m., or you are not near the red knob by 10 a.m., go down. Retreating from high on the face is slow and hard.
Crux
The 5.7 pitch high on the route. It follows a steep, right-facing corner with a small roof about halfway up. The pitch below it offers a 5.6 corner or a harder 5.9 split in the arete.
Route-finding
Hard. The face has many ledges and it is easy to drift off line. Study the route in advance. The descent down the South Gully is also confusing and has caught many parties.
Water
The creek and South Colony Lakes are the last water. There is none on the face. Fill up and filter at the upper lake and carry 2 to 3 liters on the climb.
From Westcliffe, drive south on Colorado 69 for 4.5 miles. Turn right on Colfax Lane and drive 5.5 miles to its end. Turn right onto a dirt road and go 1 mile to a junction. Keep going straight on road 120; in 0.3 mile you reach the lower 2WD trailhead at about 8,800 feet.
With a high-clearance 4WD, you can continue another 2.7 miles to the upper trailhead near 9,950 feet, where parking and camp spots sit just before a river crossing. The road beyond has been closed with a gate since 2009. The trail starts beside the kiosk in the main parking area. Stats for this route assume you start at the upper trailhead.
TundraTalus and screeScramblingExposed to lightning
The line is elevation, the band underneath is the ground, and the numbered dots match the steps below. Mileage and elevations are approximate.
1
Upper South Colony trailhead 9,950' · 0 mi
Start at the kiosk by the main parking area. Follow the standard approach for Humboldt Peak's west ridge up the South Colony valley.
Watch for: Walking from the lower 2WD trailhead adds almost 3 miles each way.
2
Junction near Upper South Colony Lake 12,000' · 4.4 mi
Near 12,000 feet, reach the junction where the Humboldt trail keeps climbing and a side trail heads left (west) toward Upper South Colony Lake. Take the left branch.
Watch for: Battling dense willows on a path that keeps fading means you turned off the Humboldt trail too soon.
3
South shore of the upper lake 12,050' · 4.7 mi
Follow the clear trail through scattered willows and along the south side of the lake toward the Needle. Fill water here.
Watch for: Last water on the route.
4
Base of the face 12,300' · 4.9 mi
Climb the talus cone below the east face. Find the large open-book feature cutting through the lowest cliffs. Well into summer, snow often lingers at the base of the cliffs a little south of the start.
Watch for: To use the ledges start, turn off the Broken Hand Pass trail at the second big cairn. Go north through grass and willows and up talus, and get by the first cliff band on its right side. Then take grassy ledges to the left before crossing the face to the right, heading for the arete.
5
Direct start pitches 12,900' · 5.05 mi
Rope up. Climb two or three pitches in the middle of the open book, rated about 5.4 to 5.6. The hardest parts are the first traverse into the book and a steeper crack at the start of the second pitch. The book fades into broad ledges.
Watch for: Protect the traverse at the start. It is easy to underestimate.
6
Red knob 13,300' · 5.2 mi
Climb Class 3 and 4 ledges up the face until a wall blocks the way just below a reddish knob. Climb the wall directly (mid fifth class) or go around to the left and back right on Class 3 ledges. The two starts join on the arete above the knob.
7
First mandatory fifth-class section 13,500' · 5.25 mi
The next 100 feet or so above the knob is low fifth class. Stay on the arete or just left of it. Many parties rope up for a short pitch here.
Watch for: Exposure is serious. A fall here would not stop quickly.
8
Belay ledge below the headwall 13,700' · 5.35 mi
The arete eases into more Class 3 and 4 ledges. A small headwall can be bypassed on the right on Class 4 grassy ledges, or climbed directly as a short fifth-class pitch. Either way, reach a worn dirt platform below a clear crack and set a belay.
9
First headwall pitch 13,800' · 5.4 mi
You can take either the right-facing corner on the north (5.6) or the crack that splits the arete (5.9). Both have old fixed pitons. On the 5.6 option, parties carrying a 50 meter rope might have to simul-climb briefly before reaching the next belay.
Watch for: Do not trust old pitons. Back them up with your own gear.
10
5.7 crux dihedral 13,950' · 5.45 mi
After a bit of Class 3, climb the steep right-facing corner for about 50 meters. The hardest move is a small roof halfway up, and it takes good protection. Above it the corner continues at about 5.6 to a wide ledge.
Watch for: This is the crux. Place gear often.
11
Summit of Crestone Needle 14,196' · 5.6 mi
From the ledge, climb an obvious Class 3 gully to the summit ridge. The top is a short walk to the north.
Watch for: Plan your descent before you celebrate. The hard part of the day is not over.
Getting down
Descend the standard South Gully route, which is Class 3. Learn that route before you climb the arete. Do not go down the gully that drops west from the summit. It is the wrong one. Instead, head back south past where the Ellingwood route tops out to find the correct gullies, which lead toward Broken Hand Pass. From the pass, follow the trail back down into the South Colony basin and out to the trailhead. Rain turns the gully rock slick and makes the downclimb dangerous. More than one party has ended up stuck out overnight because they picked the wrong descent.
If things go wrong
Bailing is hard once you are on the face. Below the red knob, you can retreat down the ledges, often with rappels, if you have the gear and skill. Above the knob, it is often safer to finish the route than to rappel the upper face. Carry enough gear to build anchors for retreat. If a storm arrives before you start, stay off the face. Upper South Colony Lake is your safe place to regroup. In an emergency, call 911 if you have signal. Rescue from the face will take many hours.
Other routes
Every way up Crestone Needle we list, with its class.
Ellingwood Arete / Ledgesthis routeClass 5 11.25 mi
Conditions change the route
This describes the route in its usual season. Distances and elevations are close estimates for planning. Snow, ice, rockfall, a washed-out road or an afternoon storm can make it a very different climb. Check recent conditions the week you go and turn around when the day tells you to.